Table of Contents
- 1. Installation
- 2. Uninstall / Deactivation
- 3. Configuration
- 4. Use of risk management
To install Agile Risk Management directly via Atlassian Marketplace on your JIRA installation you need to perform the following steps:
Navigate in your browser to the following adress https://marketplace.atlassian.com
Log in at Atlassian with you credentials.
Search at the menu item "purchase" for "Agile Risk Management" in the search field
Follow the related link in the search results.
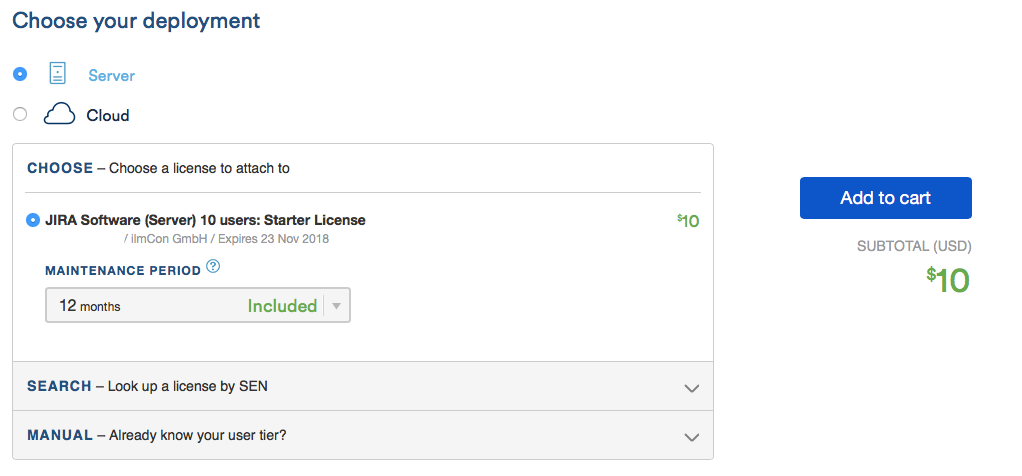
Click on the following page on the point "purchase now" .
Select in the required licence version.
Complete all required fields of the purchase form and click on "add to cart".
Finalize the purchase with the payment.
To purchase and install Agile Risk Management in your JIRA installationyou need to perform the following steps:
Log on your JIRA installation as administrator
Select the item "Plugins" in the administration dropdown list.
Select "Manage Add-Ons" on the left side.
Search for Agile Risk Management for JIRA in the search field. The current Add-On Version will be displayed in the results.
Select "Buy now" to get your licence for Agile Risk Management for JIRA. You will be asked to log in at Atlassian. After the sucessful login the download and installation starts.
Enter the required information. The button "generate licence" connects you with the licence purchase of Atlassian.
There you can also find the links for purchase, renew or update and downloads. After a sucessful transmission you receive the licence key. You can copy it and enter it in the Add-On configuration.
After you have entered the licence key in the add on administration click on the button "update" do finalize the acrivation.
To deactivate Agile Risk Management in your JIRA installation you need to perform the following steps:
Log into your JIRA installation as administrator.
Select the item "Plugins" in the admin drop down list.
Select "Manage add-ons" on the left side.
Search in the list of installed add-ons for "Agile Risk Management" and open the options by clicking on the arrow. You see now the option "Deactivate".
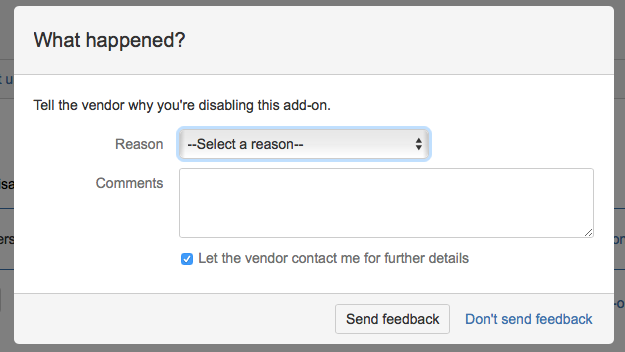
Click on "deactivate". In the opening popup you can enter a reason for the deactivation of Agile Risk Management. If you like you can submit individual comments in the textfield or submit the deactivation without any feedback.
In case of deactivation of the add-on due to technical problems you can also request a contact with the vendor for further information (eg. to solve problems).
By clicking on the button "submit feedback" you can finalize the deactivation.
To uninstall "Agile Risk Management" you need to perform the following steps:
Log into your JIRA installation as administrator.
Select the item "Plugins" in the admin drop-down list.
Select "Manage Add-Ons" on the left side.
Search in the list of installed Add-ons for "Agile Risk Management" and open the options by clicking on the arrow. You see now the item "uninstall"
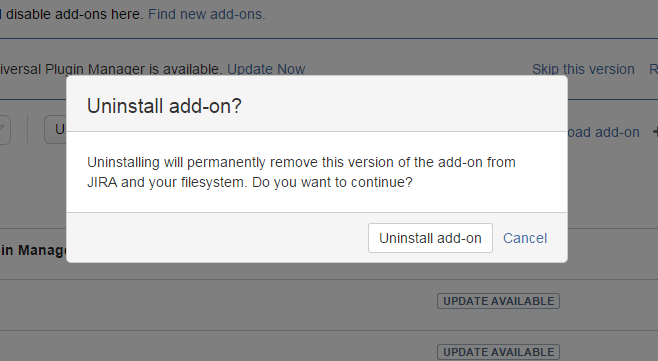
Click on "uninstall" and confirm the uninstallation in the opening window.
By clicking on "uninstall Add-on" the add-on will be uninstalled. In the opening window you can enter a reason for the uninstallation of "Agile Risk Management". On demand you can leave additional comments in the text field or submit the deaktivation without any comments.
In case of uninstallation of the add-on due to a technical problem you can request contact by the vendor by checking the checkbox (eg. for problem solving).
By clicking on the button "send feedback" the uninstallation will be finished.
All required settings for "Agile Risk Management" are done in the project settions of the selected JIRA project. You can reach the project settings on the menu at the side with the button "project settings" The project settings contain the configuration for the fields, categories, rights and calculation formulars..
In the settings for the field configuration you can add, change and delete the settings for the following elements
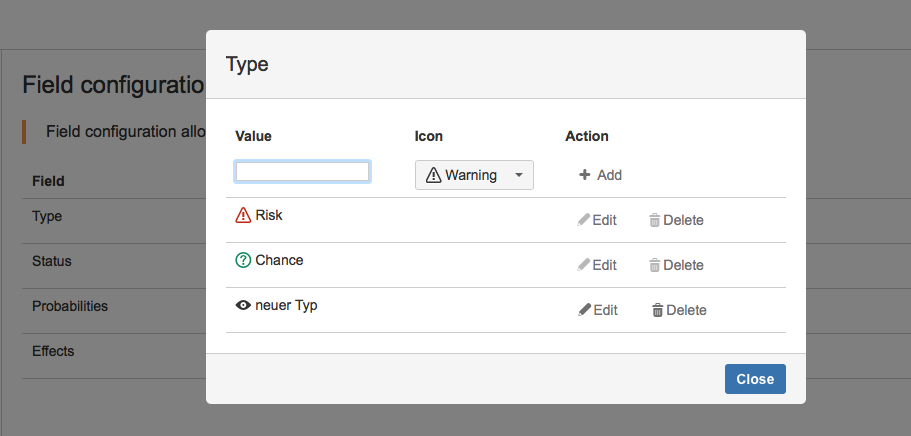
Type configurationen allow you the creation of new, editing and the deletion of existing types of risks for the risk management. As standard the two types "risk" and "chance" are created with the related icon. New created types can be selected when creating or editing risks. The types "risk" and "chance" can not be deleted. New added types of risks which are already assigned to an entry cannot be deleted.
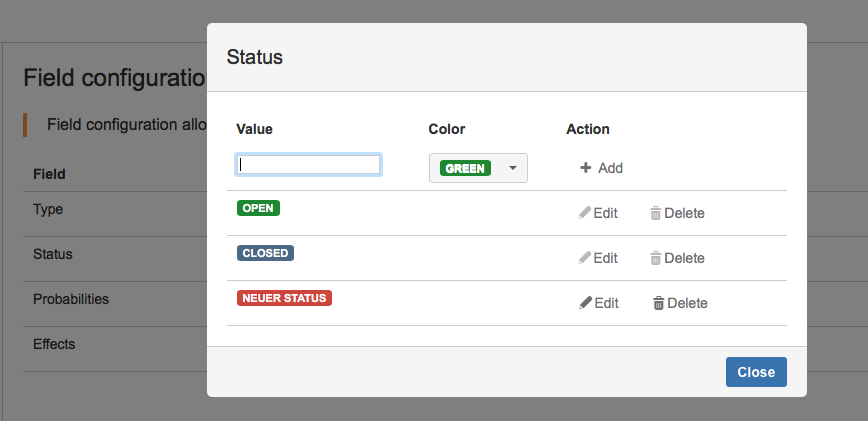
The Status configuration allows you the creation of new, editing and the deletion of existing status description in the risk management. As default the status "open" and "closed" are created with a related color automatically. One new status required a value and selection of a related color. The two standard status description "open" and "closed" cannot be removed. New created status descriptions can be selected when editing a risk.
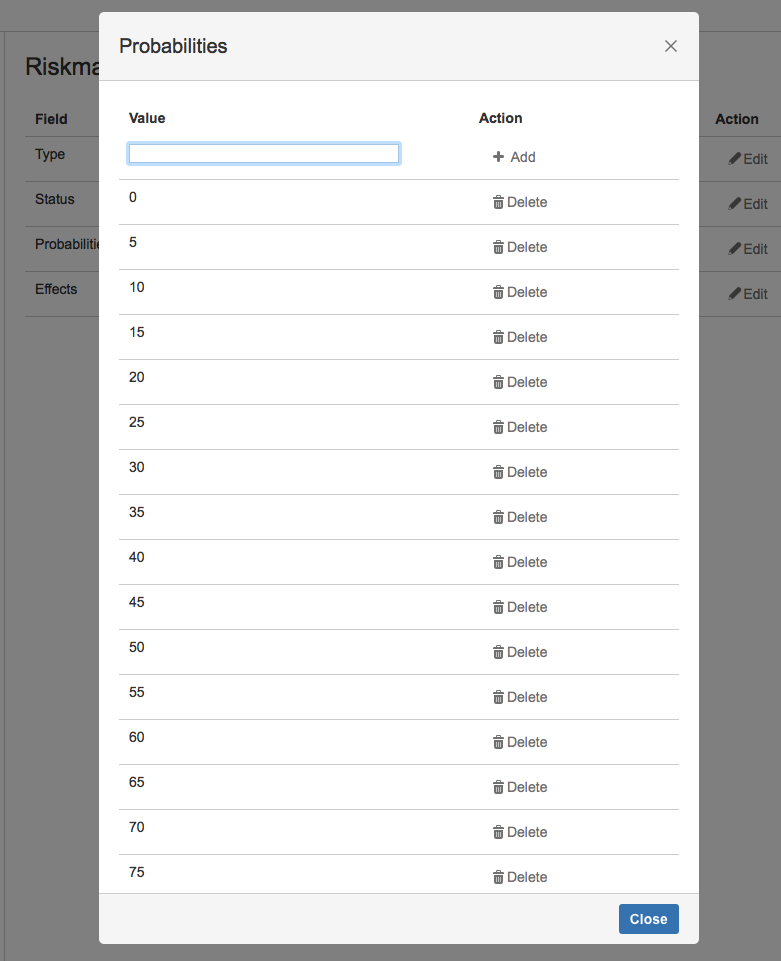
In the dialog propabilities you can set up the %-values for the occurance. The values can be between 0 to 100 and are created as standard with 5 as interval. They can be extended with any number. Corresponding occurance propabilities have to be entered as number without %. The selection of the probability occurs when creating a new or editing an existing risk.
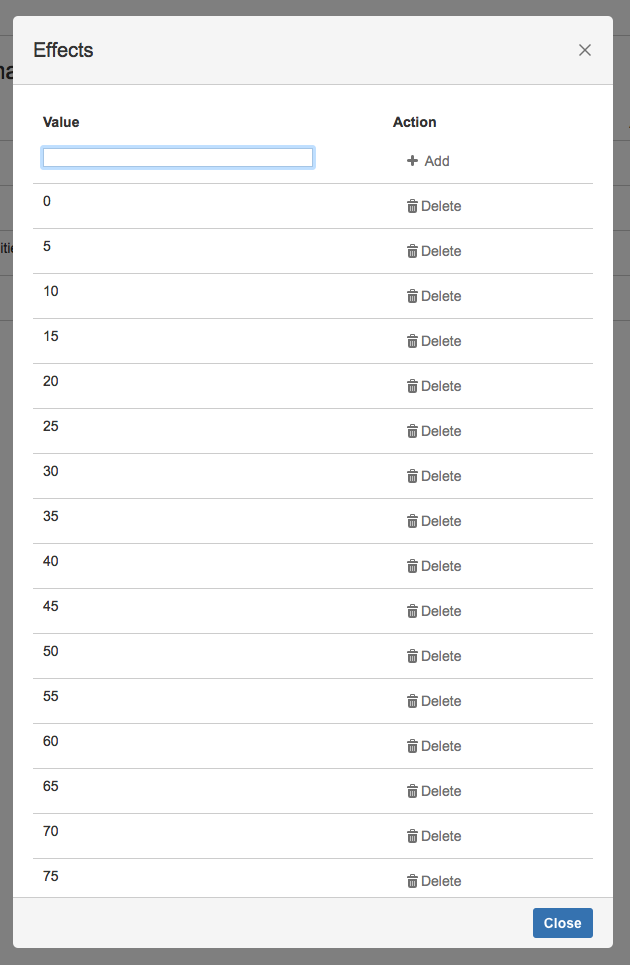
In the dialog effects you can set up the values for the effect in %. The values 0 till 100 are created as standard in steps of 5 and can be extrended on demand. Assigned effects have to be entered as numeric value without "%". The selection of effects is done when creating a new or ediiting an existing risk.
In the settings of the category configuration the following elements can be added, changed or deleted. Category configuration are used for adjusting the risk matrix.
The category configuration in the tab effects allows you the definition of risk effects including naming based on the selected effects in % from Section 3.1.4, “Effect configuration”. Effect categories are displayed horicontal in the risk matrix. The for the related category defined range (from - to) is used for classification of risks inside the risk matrix. the classification of the range is freely selectable. New effect categories can only be added if the defined area / range from Section 3.1.4, “Effect configuration”is not fully occupied. The arrow navigation allows a sorting of the created categories.
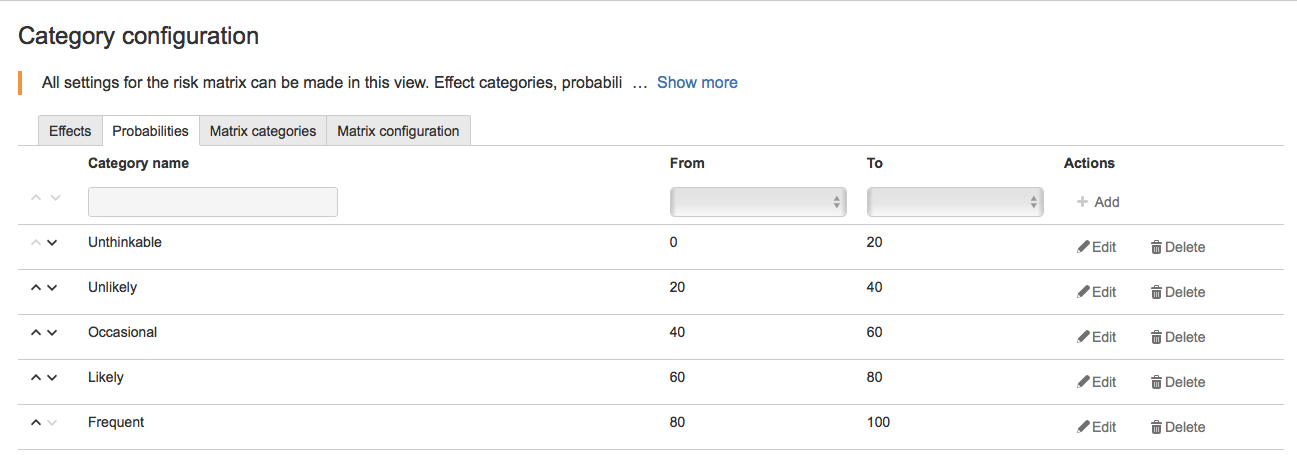
The category configuration in the tab propabilities allows you the declaration of risk propabilties including the name on basis of the configured occurance propabilities in % from Section 3.1.3, “Propability configuration”. Propability configuration are always displayed vertically in the risk matrix. The corresponding range (from - to) for the related categorie is used for the classification of risks inside the risk matrix. The classification of the range is freely selectable. New propabilitiy categories can only added if the entered area / range from Section 3.1.3, “Propability configuration” is not fully occupied. The arrow navigation allows you a sorting of the created categories.
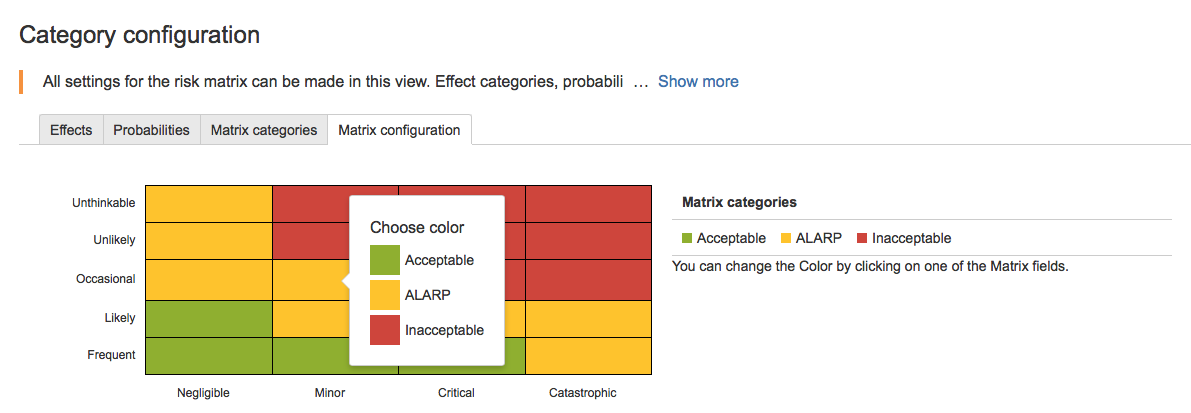
The matrix color configuration allows the color configuration of the risk matrix. In the initial state there are three areas with corresponding color configuration created. New areas can be named and assigned with a color. The allocation of categories in the matrix can be done in the tab Section 3.2.4, “Matrix configuration”.
The matrix configuration allows a color classification of the in Section 3.2.3, “Matrix color configuration” configured catetories of the risk matrix. New catetories as well as existing ones can be configured by clicking on the related table elements.
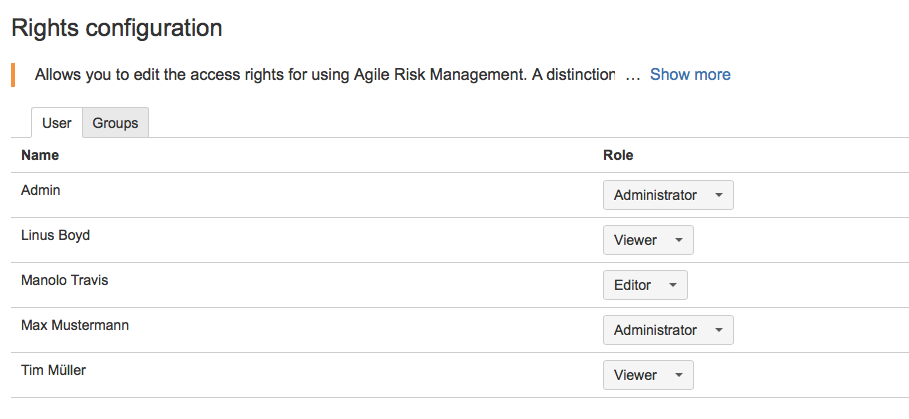
The Plugin Agile Risk Management includes three right levels. Jira system adrminstrators have independently of the selected roll access to the settings and functions.
Table 1. Rollenbeschreibung
| Rolle | Description |
|---|---|
| Administrator | Users or groups with this role can change the configuration of the plugin. They can also create, edit and delete risks, registers and subprojects. Additionally the User needs to be an Jira project administrator to see the configuration options. |
| Editor | Users or groups with this role can create and edit risks, but cannot create registers or subprojects. |
| Viewer | Users or groups with the read only role can view all values, but cannot make changes or create risks. |
| No role | Users or groups with no role dont have access to this plugin. |
For every user of a project you can assign a corresponding role in the tab "user"
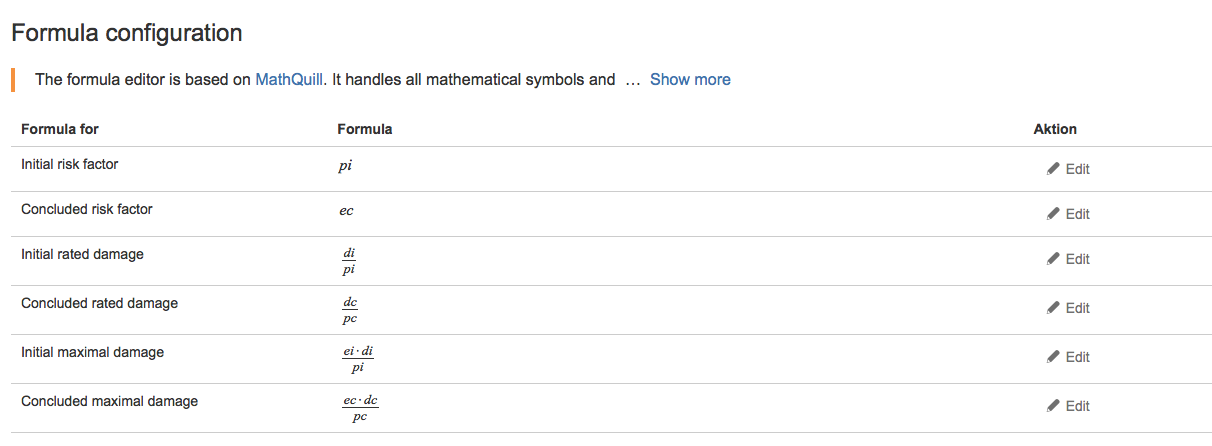
The formular configuration allows you the autonomous adjustment of all calculated values based on mathematic formulars. The following values are available in formular examples:
Initial Risk factor
Valued risk factor
initial valued damage
handled valued damage
initial maximum damage
handled maximum damage
The existing formulars of each Jira project can be adjusted individually. For adjustment of the formulars the following variables are available:
Table 2. variables description
| Variable | meaning |
|---|---|
| ei | initial impact |
| pi | initial propability |
| di | initial damage |
| ec | handled impact |
| pc | handled propability |
| dc | handled damage |
All known mathematical signs and symbols for creation of individual formulars are supported
The start of Agile Risk Management occurs of a previously selected Jira project. The project centric access allows you the management of risks and events centrally in the same project. Agile Risk Management is therefore integrated in the central in the daily project work. If you have no access to the menu point please check first the Section 3.3, “Right configuration”.
The risk dashboard (Overview) is used as central entrance for the risk management. After the initial installation / configuration of a new project you receive the message, that no risk register is created. (see also Section 4.2, “Risk register”). Risk register are central part to structure risks. To get access on the dashboard you mandatory need to create a risk register.
If you have already created a risk register you get automatically access to the dashboard. The dashboard allows acces to the central components of Agile Risk management. The following functions are available:
Show, create and delete shortcut to the risk register Section 4.2, “Risk register”
Show, create and delete shortcut to the sub project Section 4.3, “Sub projects”
Shortcut to the risk navigator - Section 4.5, “Risk navigator”
create risk dialog
Risk Matrix + Filter - Section 4.1.1, “Risik matrix”
Risk Chart + Filter - Section 4.1.2, “Risk chart / Risk development”
Legend Risk matix categories
Export initial / treated risk matrix as transparent graphic (PNG)
Export risk type / risk development as transparent graphic (PNG)
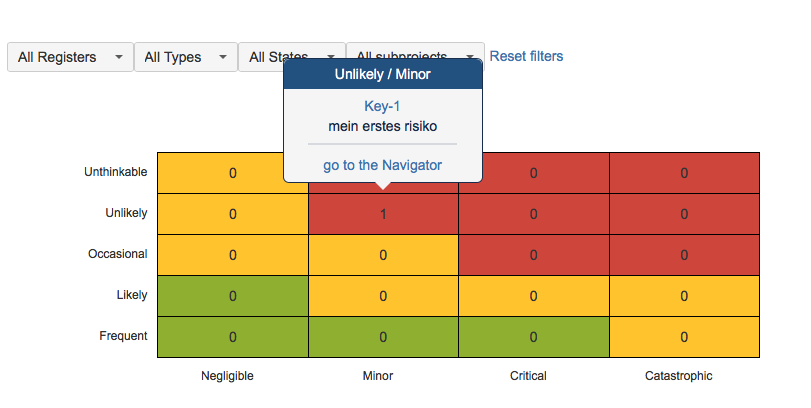
The easy to filter risk matrix provides an information about the classification of risks, based of the defined values of propability and effect of the risk. There are always two risk matrix shown. The left risk matrix shows the classification of initial, untreated risks values. The right risk matrix show the values regarding treated propabilites (vertical) and treated effects (horicontal). The classification in both matrix is done on basis of the defined values for propability and effect in dependance of the defined categories and threshold values in the administration (Section 3.2, “Category configuration”). This allows you a company / individual configuration. The export function (transparent graphic) for the initial and treated risk matrix enables further processing of corresponding tables in other programs.
An initial filled risk matrix shows the single risks by mouseover in their category. With a link you can reach the filtered result in the risk navigator (Section 4.5, “Risk navigator”).
A filled treated risk matrix shows on mouse over the single risks associated to their category. With a link you can reach the filtered result in the risk navigator. (Section 4.5, “Risk navigator”).
The result of the both risk matrix can be limited by using the respective filters. For filtering the following options are available:
Filter Risk register
Filter Risk Type
Filter Risk Status
Filter sub project
Every activated filter limits the result accordingly the selected values. The filter can be combined with each other. The filters risk register as well as sub projects are only available if the respective items are created. All register sum up the results of all created risk register. If no filter is set all matrix show always all risks. The option "reset filters" resets all selected filters.
The risk chart / risk development is only displayed if the underlying risk register is a monetary risk register. (Section 4.2.2, “Monetary risk register”). In the risk development all risk of the related risk registers are displayed. A display of the related initial amount of damage of a risk as well as the treated amount of damage of a risk is shown. The data for all risks are summed up in the corresponding register and displayed with their history. On the basis of risk development it is possible to review of the monetary development of all included risks. The single chart element can be shown / hidden with a click on the legend.
The setting dialog (gear) allows you to define the interval of total monetary risks to be considered. An interval of 30 days is stored as standard. As with the risk matrix, the export function (transparent graphic) enables further processing of the data in the corporate process.
Risk register are used for structuring of projects. In every JIRA project any number of risk register can be created. Risk register are described by the following required fields:
Key - Key for identification of risks
Name - Name of risk register
Description - Description of risk register
type of analysis - Risk register Type
monetary - allows monetary analysis of risks categorised by propability and effect.
scalar - allows the categorization of risks by propabilities and the expedted effects.
Created risk registers can only be deleted, if they contain no risks. The created risk register analysis type affects the visibility of assigned risks and their related field in risks.
Scalare Risk register allow the scalare analysis of risks for cagegorizing of probability of occurance and the expected effect. Scalare risk register can be analyzed in the risk matrix.
Risks in scalare risk registers contain the following fields:
Propability:
initial propability
treated propability
Effect:
initial effect
treated effect
The values for propabilities and effects need to be configured in the Section 3.2, “Category configuration” categorie configuration.
Monetary risk register allow a monetary analyzes of risks additionally to the categorization of propability of occurance and to the expected effects.
Risks in the monetary risk registers have the following fields:
propability:
initial propability
treated propability
Effect:
initial effect
treated effect
damage:
initial damage in €
treated damage in €
The values for probabilities and effects have to be configured in the Section 3.2, “Category configuration” category configuration. The values for the damage correspond with the expected initial / valuated damage in euro.
Sub projects are used for the structuring of projects and risks. Sub projects are on the same level as the risk register. In every risk register every sub project is available. In every JIRA project you can create any sub project required. Sub projects are described with the following required fields:
Keys - Keys are used for the identification of sub projects
Name - Name of the sub project
Description - Description of the sub project
Created sub projects can only be deleted if there are no more risks assigned.
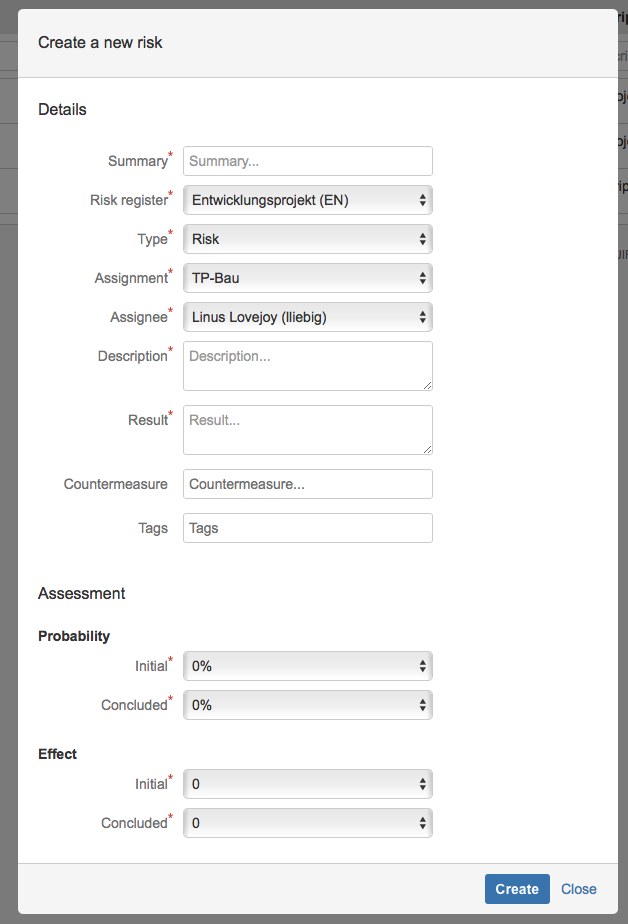
Risks can be created directly from every view. Therefore the dialog "Create risk" is opened. In the dialog the following required fields need to be filled out:
Summary - Describes a risk analogue to the summary of JIRA Issue
Risk register - Selection of the created risk registers
Types - Risk Type (see Section 3.1.1, “Type configuration”)
Sub Project - Selection of the created sub projects
Editor - Selection of JIRA users in the project
Description - Description of the risk, analogue to the description of JIRA Issue
Consequence - Description of the consequence when the risk occurs
propability:
initial propability
treated propability
effect:
initial effect
treated effect
Damage: - Is only available if a monetary risk register was selected
initial damage in € (Euro)
treated damage in € (Euro)
In the dialog to create risks the following fields are available:
Countermeassures - Selection of JIRA Issue in the project to associate coutermeassured of JIRA Issue
Notes - Notes are used for the identification of risks
You can find created risks in the Section 4.5, “Risk navigator”
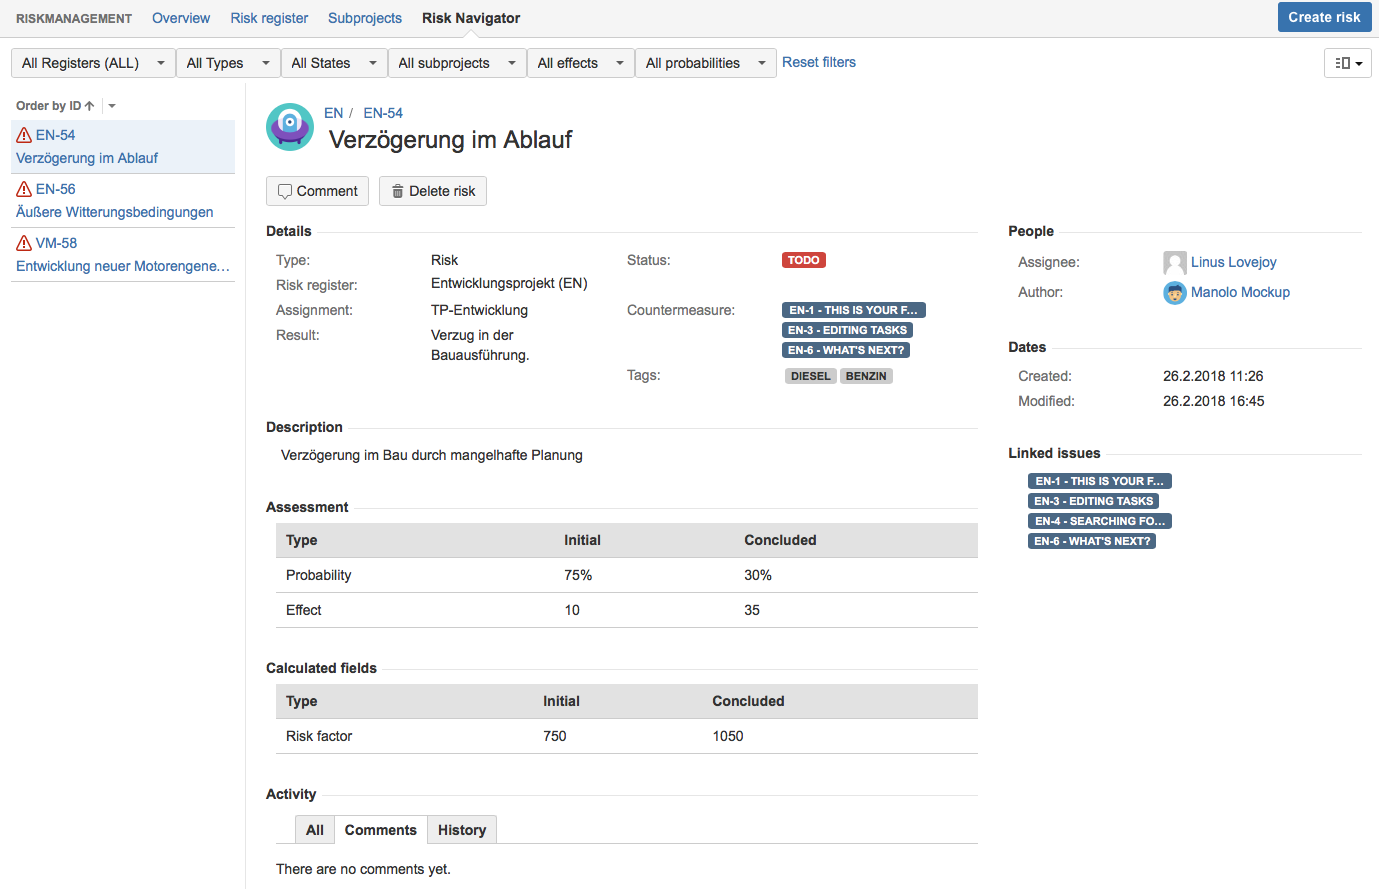
The risk navigator is used for the administraton of risks, chances and all created types. The navigator allows to sort, to filter, to edit and delete risks. Risks can be displayed in two different views.
Detailed view - divided view in 2 columns (Risk list and risk details)
List view - list view with all existing risks in the project
The following filter options are available:
Risk register
Risk types
Risk Status
Sub Projects
Effects - each initial and treated
Propabilities - each initial and treated
The following sorting functions are available:
treated effect
treated damage
treated propabilities
Description
Result
ID
initial effect
initial damage
initial propability
Sub project
Title
The risk navigator allows you to switch between the detailled and list view.
The detailled view is the standard view when opening the risk navigator. This view allows the selection of risks in the left column and the processing of them in the right column.
The list view provides an overview of all risks. As in the list view the results can be filtered. With the selection of a risk you receive the detailled view of a risk.
Risks can be edited in the detailled and list view. To edit a risk the following fields are available for editing:
Summary - Summary of the description of a risk
Type - Defines the type of risk (see Section 3.1.1, “Type configuration”)
Status - Defines the status of the current risk (see Section 3.1.2, “Status configuration”
Sub project - Defines the classification of a risk in a sub project
Consequence - textual description of the consequence on occurance of the risk
Countermeassures - Selection of existing JIRA Issue for linking (see Section 4.6, “Integration in Jira Issue”)
Keywords - free selection of keywords for better identification of risks
Editor - Selection of project users in JIRA
Description - Detailed description of the risk
Propability initial / treated - Propability in % (see Section 3.1.3, “Propability configuration”) to enter the propability of occurance and classification in the category in the risk matrix
Imapct initial / treated - Declaration of effect (see Section 3.1.4, “Effect configuration”) to enter the effect / impact and classification of the category in the risk matrix
Damage initial / treated - monetary view on the damage value in € (Euro)
Connected Issue - selection of existing JIRA Issue to connect risks to Issue (see Section 4.6, “Integration in Jira Issue”)
All available fields for editing can be edited directly by clicking on mouseover similar to JIRA.
Besides editable fields there are calculated fields available:
Risk faktor initial / treated - calculated value after defined formular (see Section 3.4, “Formular configuration”)
Valuated damage initial / treated - calculated treated damage after defined formular (see Section 3.4, “Formular configuration”) - is only available for risks which are assigned to a monetary risk register
maximum damage initial / treated - calculated valued damage after defined formular (see Section 3.4, “Formular configuration”) - is only available for risks which are assigned to a monetary risk register
Chart - monetary risk development as history timeline - is only available for risk which are assigned to a monetary risk register
Risks can be deleted with the button "Delete risk". For communication and documentation you can add comments with the button "comments". The tab "all" shows all changes and created comments. The tab "change history" shows only changes.
